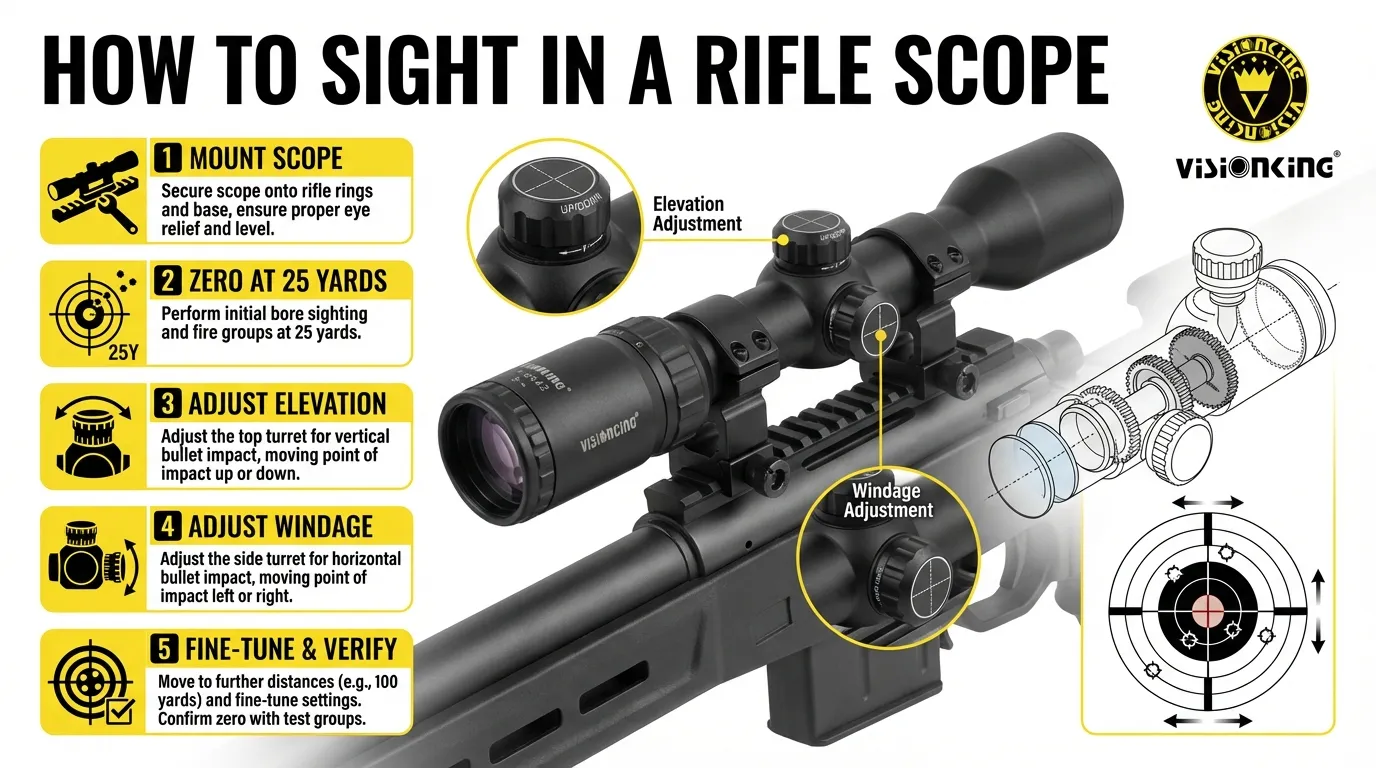
What Does Sighting in a Rifle Scope Mean?
Sighting in a rifle scope, commonly known as zeroing, is the mechanical process of aligning your optic so that the Point of Aim (POA) matches the Point of Impact (POI). Simply put, you are adjusting the scope\’s internal components to ensure the bullet strikes exactly where the crosshairs are resting at a specific distance. Without this critical alignment, the bullet\’s path and your line of sight remain independent, making accuracy impossible regardless of the rifle\’s quality.
The Importance of Zeroing Your Scope
A zeroed scope is the foundation of marksmanship. If your optic is not calibrated to your rifle and ammunition, you cannot reliably hit a target. Proper zeroing serves two main purposes:
- Consistency: It ensures that shots land predictably, allowing for tight groupings.
- Efficiency: It prevents the waste of precious ammunition during range sessions or hunts.
Learning how to sight in a rifle scope correctly saves time and frustration, moving you from guessing where shots will land to knowing exactly where they will impact.
Understanding Scope Parts: Reticles and Turrets
To adjust the Point of Impact, you must manipulate the scope\’s turrets. These knobs physically move the erector tube inside the scope housing.
- Elevation Turret: Located on top of the scope, this adjusts the vertical impact (Up/Down).
- Windage Turret: Located on the right side, this adjusts the horizontal impact (Left/Right).
- Reticle: The crosshair pattern used for aiming.
- Mechanical Zero: The physical center of the scope\’s adjustment range. Finding this before mounting ensures you have equal travel in all directions for future adjustments.
Basic Ballistics and Bullet Trajectory
Bullets travel in an arc due to gravity, while your scope looks in a straight line. Zeroing intersects these two paths at a chosen distance. To make accurate adjustments, you must understand the unit of measure your scope uses:
- MOA (Minute of Angle): Common in American optics. 1 MOA is approximately 1 inch at 100 yards. Most turrets adjust in 1/4 MOA clicks, meaning 4 clicks move the impact 1 inch at 100 yards.
- MRAD (Milliradian or Mil): Common in tactical optics. 1 Mil is approximately 3.6 inches at 100 yards. Most turrets adjust in 0.1 Mil clicks, moving the impact 0.36 inches at 100 yards.
Crucial Note: Adjustment values change with distance. At 25 yards, a 1/4 MOA click moves the bullet only 1/16 of an inch. You need four times as many clicks to move the impact the same physical distance on paper at 25 yards compared to 100 yards.
Preparation and Essential Equipment
Before we fire a single shot, we need to set the stage. Learning how to sight in a rifle scope effectively is 90% preparation. If your gear isn\’t set up correctly or you don\’t have the right tools, you will waste ammunition chasing bullet holes around the paper.
Ensuring Proper Scope Mounting and Eye Relief
The most common reason shooters struggle with sighting in rifle scope setups is loose hardware. I always double-check that my rings and bases are torqued to the manufacturer\’s specifications. If the scope moves even a fraction of a millimeter, your zero will shift.
Next, check your eye relief. This is the distance between your eye and the rear lens.
- Shoulder the rifle naturally with your eyes closed.
- Open your eyes. You should see a clear, full picture without black rings around the edges.
- Adjust forward or backward until the image is perfect.
If you have to crane your neck forward or pull your head back, the mount is wrong. Proper eye relief prevents \”scope bite\” (recoil hitting your eye) and ensures consistent alignment.
Stabilizing Your Rifle with a Bench or Rest
When learning how to sight a rifle scope, you must eliminate human error. You are testing the mechanical accuracy of the optic and the rifle, not your shooting ability. You cannot do this effectively while standing or kneeling.
I recommend using a solid shooting bench with a stable rest.
- Lead Sleds: These are best for reducing recoil and holding the rifle completely still.
- Sandbags: A front and rear bag setup works great.
- Bipods: Useful, but ensure you have a rear bag for stability.
The goal is to have the crosshairs resting on the target without you holding the rifle up. If the rifle wobbles, your adjustments will be inaccurate.
Essential Tools and Targets for the Range
Don\’t go to the range empty-handed. To figure out how do you sight in a rifle scope quickly, you need specific gear. Bring the Allen keys or screwdrivers that fit your scope rings and turrets. You should also use the exact ammunition you plan to hunt or compete with, as different bullet weights fly differently.
Checklist for your range bag:
- Grid Targets: These make calculating adjustments much easier than plain circles.
- Ear and Eye Protection: Non-negotiable safety gear.
- Spotting Scope: To see your hits without walking downrange.
- Range Finder: Guessing distance creates errors. I use a Visionking 6×25 Solar Power Range Finder to ensure my target is placed at exactly the distance I intend to zero, whether that is 50 or 100 yards.
Having these tools ready simplifies the process of how to sight in rifle scope systems and saves you frustration.
Step 1: Initial Bore Sighting
Before you fire a single live round, you need to get your rifle roughly on target. This process is called bore sighting. If you skip this and go straight to shooting at 100 yards, you will likely miss the paper entirely, wasting precious ammunition. The goal here isn\’t perfection; it is simply to align the barrel and the scope enough to get your first shots on the target paper.
Aligning the Barrel and the Scope
The first step in how to sight in a rifle scope is establishing a \”Mechanical Zero.\” This centers your reticle within the scope\’s physical adjustment range, ensuring you have equal room to adjust up, down, left, or right later.
How to find Mechanical Zero:
- Turn the elevation turret all the way in one direction until it stops (do not force it).
- Count the total number of clicks or turns as you rotate it all the way to the opposite stop.
- Divide that number by two.
- Rotate the turret back by that half-amount.
- Repeat this process for the windage turret.
Once your scope is mechanically centered, secure your rifle in a steady rest or use sandbags. The rifle must remain completely stationary for the next steps.
Using a Laser Bore Sighter vs. Visual Alignment
You have two main methods for aligning your sights. If you are using a bolt-action rifle or an AR-platform where you can remove the bolt and look through the barrel, the visual method is free and highly effective.
The Visual Method:
- Remove the bolt from the rifle.
- Look through the back of the barrel (breech) at a high-contrast target downrange.
- Center the target visually inside the circle of the barrel.
- Without moving the rifle, look through the scope.
- Adjust the turrets until the crosshairs align with the same target you see through the barrel.
The Laser Method:
If you cannot look through the breech (like on a lever-action or pump-action), you might need a laser bore sighter. This tool inserts into the muzzle or chamber and projects a laser dot onto the target. You simply adjust your crosshairs to match the laser dot. While tools are helpful, the visual method is often sufficient for sighting in rifle scope setups without extra gear.
Making Preliminary Adjustments at Short Range
The smartest \”shortcut\” for beginners is to start at a close distance. Do not start at 100 yards. Instead, set up your initial target at exactly 25 yards. This ensures your first shot hits the paper, making it easy to see where you are hitting relative to your aim.
To ensure precision, use a Visionking 6×25 Laser Range Finder to measure exactly 25 yards from your shooting position. At this distance, the math is different, but the frustration is much lower. Once you are aligned at 25 yards, you will be on paper at 100 yards, ready for the final fine-tuning.
Step 2: The Sighting-In Process
Once you have completed the bore sighting, it is time to send live rounds downrange. To save precious ammunition and frustration, I always recommend starting this process at 25 yards. Starting at 100 yards immediately often results in shots completely missing the paper, leaving you guessing where the bullet went. By starting close, we guarantee the impact is visible, allowing us to dial in the scope roughly before moving out to the final zero distance.
Firing Your Initial Three-Shot Group
Get into a stable firing position using a bench rest or sandbags. Aim dead center at the target and fire three rounds. Do not adjust your scope after the first shot, even if it looks off. We need to establish a \”group\” to determine the rifle\’s consistent Point of Impact (POI).
If you chase every single bullet hole with an adjustment, you will end up chasing your tail. Fire three shots, then look at the cluster. Identify the center of that three-shot group; this is the point you will measure from relative to your Point of Aim (POA). Whether you are using a standard hunting optic or a Visionking 3-9×40 Mil-dot Tactical Scope, the principle of grouping remains the foundation of accuracy.
Calculating MOA or Mil Adjustments
This is where the math catches people off guard. Most scopes adjust in either Minutes of Angle (MOA) or Milliradians (Mils/MRAD). The value of a single \”click\” on your turret changes depending on your distance from the target.
- MOA Scopes: Standard clicks are 1/4 MOA. At 100 yards, one click moves the bullet 1/4 inch. However, at 25 yards, that same click only moves the bullet 1/16 inch.
- Mil Scopes: Standard clicks are 0.1 Mil. At 100 yards, one click moves the bullet 0.36 inches. At 25 yards, it moves a tiny 0.09 inches.
Because you are closer to the target, you need four times as many clicks to move the impact the same physical distance compared to 100 yards. If you are using a precision optic like the Visionking 2-16×44 Side Focus FMC Scope, understanding these values is critical to utilizing its Mil-dot reticle effectively.
Adjusting Turrets for Windage and Elevation
Now we apply the adjustments to the turrets. The golden rule for how to sight in a rifle scope is to \”Follow the Bullet.\”
- If your group is Low, turn the elevation turret Up.
- If your group is Left, turn the windage turret Right.
Let’s look at a practical example for a 25-yard zero. Suppose your group is 1 inch low.
- At 100 yards, you would need 4 clicks (1 inch / 0.25) on a 1/4 MOA scope.
- At 25 yards, because the click value is 4x smaller, you need to multiply your adjustment by 4.
- Result: You need 16 clicks Up to move the impact 1 inch at 25 yards.
Make your adjustments, fire another three-shot group to confirm you are hitting the center, and then you are ready to move the target out to 100 yards for the final confirmation.
Confirming Accuracy at Your Chosen Distance
Learning how to sight in a rifle scope properly concludes with confirming your zero at the actual distance you intend to shoot. This step transitions you from rough adjustments to precision accuracy.
Why 100 Yards is the Standard Zero Distance
Most shooters choose a 100-yard zero, and it is the industry standard for good reason. At this distance, the bullet flight has stabilized, yet environmental factors like wind have minimal effect compared to longer ranges. It also simplifies the math; at 100 yards, 1 MOA is almost exactly 1 inch. If you know how to sight a rifle scope at 100 yards, you establish a solid baseline for dialing elevation for longer shots later.
Adjusting for Different Distances and Scenarios
While 100 yards is standard, your specific scenario might dictate a different zero. Hunters often prefer a \”maximum point blank range\” zero (often 200 yards) to avoid holdovers on game.
- 50 Yards: Best for rimfire rifles or dense brush hunting.
- 100 Yards: The gold standard for target shooting and tactical applications.
- 200 Yards: Ideal for open-country hunting.
When verifying zero at these extended distances, seeing bullet holes with the naked eye is nearly impossible. I highly recommend using a powerful Visionking 30-90×100 spotting scope to clearly spot your impacts without wasting time walking downrange.
| Zero Distance | Primary Use Case | Trajectory Note |
|---|---|---|
| 50 Yards | .22LR / Close Range | Bullet may strike high at 100y |
| 100 Yards | General Purpose | Easy math for adjustments |
| 200 Yards | Long Range Hunting | Bullet strikes high at 100y |
Final Group Confirmation and Fine-Tuning
Sighting in rifle scope setups requires final validation. Do not rely on a single lucky shot to confirm your zero.
- Cool Down: Allow your barrel to cool to ambient temperature to prevent heat drift.
- Fire a Group: Shoot a careful 3-shot or 5-shot group.
- Analyze: The center of the group should be dead center on the bullseye.
- Reset Turrets: Once confirmed, loosen the turret screws and slip the caps to read \”0\”.
If you find your current optic struggles to maintain this precision after repeated recoil, you may need to upgrade to more robust optical products that hold zero reliably. This ensures that how do you sight in a rifle scope becomes a one-time task rather than a constant struggle.
Common Problems and Troubleshooting
Even when you know exactly how to sight in a rifle scope, things can go wrong. Sometimes the bullets just won\’t group, or the point of impact shifts unexpectedly. Before you blame the optic, we need to run through a few common mechanical and environmental checks to get you back on target.
What to Do If Your Scope Won’t Hold Zero
If your shots are wandering all over the paper after you have finished sighting in rifle scope adjustments, the first place to look is the mounting system. Loose screws are the number one cause of wandering zero.
- Check the Base and Rings: Ensure all screws are tightened to the manufacturer\’s recommended torque specifications.
- Inspect the Barrel: Make sure the barrel isn\’t touching the stock (unless it\’s designed to), as this affects harmonics.
- Swap Ammunition: Inconsistent powder loads in cheap ammo can cause erratic groups. Try a premium box to rule this out.
If the hardware is solid and the ammo is good, the scope internals might be damaged. A \”box test\” can verify if the turrets are tracking correctly.
Dealing with Reticle Cant and Parallax Issues
Two subtle errors can make learning how to sight rifle scope setups frustrating: cant and parallax.
Reticle Cant: This occurs when your scope is not perfectly level with the rifle. If the crosshairs are tilted, your adjustments for elevation will inadvertently change your windage. Use a small bubble level during installation to ensure the vertical crosshair aligns perfectly with the bore.
Parallax: If you move your head slightly while looking through the scope and the crosshair appears to float or move across the target, you have a parallax error. This means the target image and the reticle are not on the same focal plane. Adjust the parallax knob (usually on the side or the objective bell) until the reticle stays crisp and stationary against the target, regardless of eye movement.
How Often Should You Re-Sight Your Rifle?
Once you figure out how do you sight in a rifle scope, you shouldn\’t need to do it every range trip, but maintenance is key. You should confirm your zero whenever:
- You Change Ammo: Different bullet weights and velocities fly differently.
- After Travel: Bumps and vibrations during transport can shift the scope.
- Significant Weather Changes: Drastic shifts in temperature or altitude affect air density and ballistics.
I always recommend bringing a reliable 60-350mm refractor spotting scope to the range so you can clearly see your impact points and verify accuracy without walking downrange after every shot. A quick confirmation group of three shots is usually enough to ensure you are ready for the field.