Understanding the Basics of Rifle Scope Settings
Mastering how to set rifle scope mechanics is the foundation of precision shooting. Before you tighten any screws or fire a shot, you must understand that a scope is a precision optical instrument designed to align your vision with the barrel\’s trajectory. Learning how to set up a rifle scope correctly transforms your firearm from a simple tool into a highly accurate system, ensuring that where you look is exactly where the bullet strikes.
How Rifle Scope Adjustments Work
At the core of how to set a scope on a rifle is the understanding of the internal erector system. When you rotate the adjustment turrets, you are physically moving an internal tube that houses the reticle.
- Clicks: Every \”click\” of the turret moves the reticle a specific angular distance, usually measured in MOA (Minute of Angle) or MRAD (Milliradians).
- Reticle Movement: Adjusting the turrets shifts the reticle to align with the bullet\’s impact point, not the other way around.
- Tracking: High-quality scopes ensure that these adjustments are repeatable and precise, allowing you to dial in corrections and return to zero reliably.
Common Terms: Elevation, Windage, and Parallax
To effectively learn how to set up scope on rifle platforms, you must be fluent in the terminology used to navigate the controls.
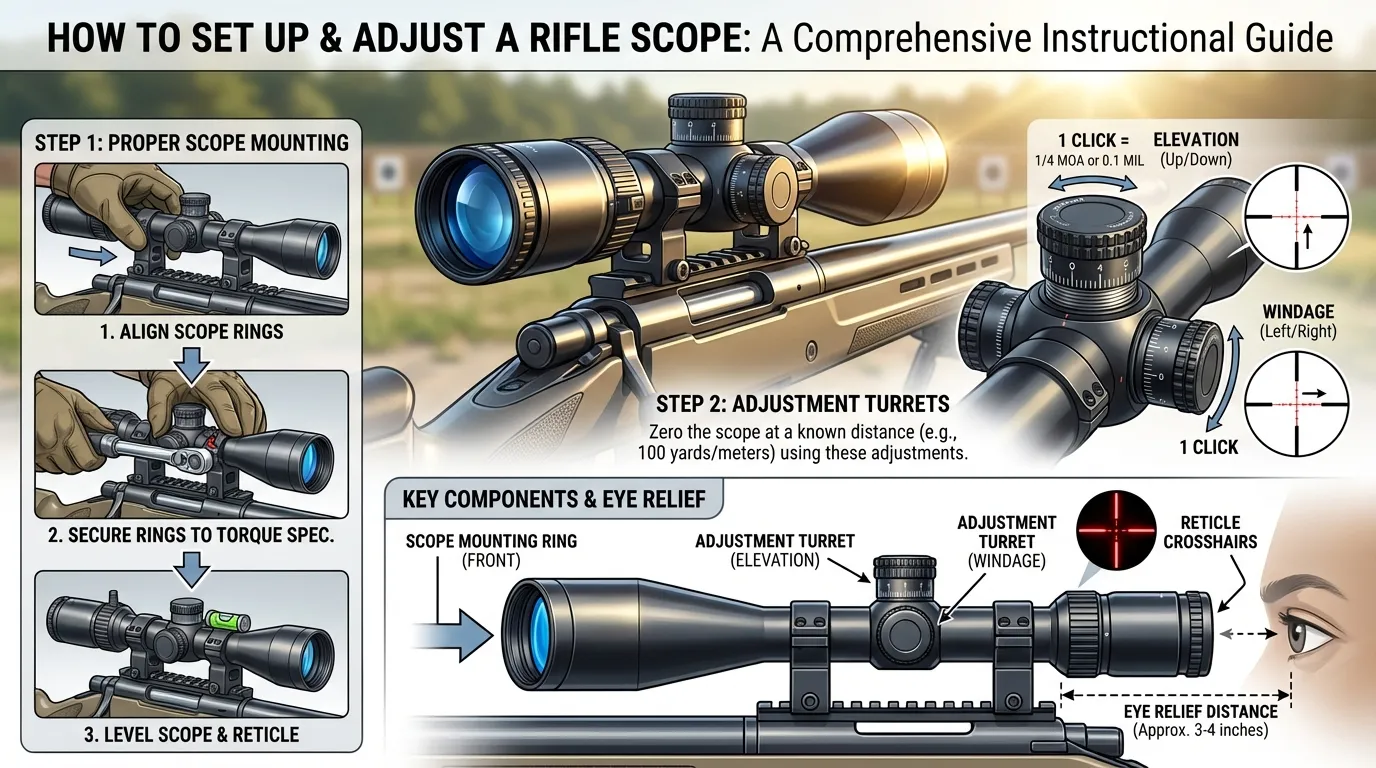
- Elevation: Controlled by the top turret, this adjusts the vertical impact of the bullet (Up and Down).
- Windage: Controlled by the side turret, this adjusts the horizontal impact (Left and Right).
- Parallax: This is an optical illusion where the reticle appears to shift position relative to the target when you move your eye. Correcting parallax ensures the reticle and target are on the same focal plane for maximum accuracy.
The Importance of Sighting In (Zeroing) Your Scope
Knowing how to set scope on rifle setups culminates in the process of zeroing. Sighting in, or \”zeroing,\” is the process of aligning your Point of Aim (POA) with your Point of Impact (POI) at a specific distance, typically 100 yards.
- Reference Point: A zeroed scope provides a consistent baseline for all future shots.
- Ballistic Calculation: Without a confirmed zero, holding over for distance or wind is impossible.
- Confidence: A properly sighted-in scope guarantees that if you miss, it is shooter error, not equipment failure.
Preparation and Tools Needed for Scope Setup
Before you start turning screws, you need to gather the correct equipment to ensure your Visionking optic performs at its peak. Learning how to set up a rifle scope correctly begins with a clean workspace and the right tools to protect both your firearm and the precision instrument you are mounting.
Essential Tools for Proper Installation
To install a scope without damaging the tube or the internal mechanics, specific tools are non-negotiable. We engineer our scopes with aerospace aluminum alloy, but improper torque can still cause issues. Here is what you need:
- Torque Wrench: Essential for tightening ring screws to the exact manufacturer specifications without crushing the tube.
- Gun Vise or Cradle: Keeps the rifle completely stationary during the process.
- Bubble Levels: Small levels for the action and the scope turret to ensure perfect vertical alignment.
- Degreaser: For cleaning the mounting surfaces of the rail and rings.
Selecting the Right Mounting Hardware
The rings and base are the critical link between your rifle and the optic. If you choose the wrong size or low-quality mounts, your zero will shift under recoil. You must match the ring diameter exactly to your scope\’s main tube, whether it is 25.4mm, 30mm, 34mm, or 35mm.
For heavy-duty applications involving high-recoil calibers like .308 or .50 BMG, we recommend using robust hardware like our 35mm mounting rings for heavy calibers, which provide maximum clamping surface area. If you are running a more standard setup, our low profile 25.4mm and 30mm rings offer a secure fit on Picatinny rails without adding unnecessary height or weight. Always verify if your receiver requires a Picatinny or Dovetail base before purchasing.
Stabilizing Your Rifle with a Bench or Rest
When figuring out how to set a scope on a rifle, stability is everything. You cannot achieve a level reticle if the rifle itself is tilting. Secure your firearm in a gun vise or use heavy sandbags on a solid shooting bench. The rifle needs to be \”hands-free\” stable. This allows you to place the scope into the bottom ring halves and rotate it freely to check for eye relief and levelness without the gun shifting position. A solid foundation now prevents frustration at the range later.
How to Mount Your Rifle Scope Properly
Mounting is the foundation of precision shooting. Even the most advanced optics, like our high-shock resistance models, cannot perform if the physical connection to the rifle is loose or misaligned. When learning how to set rifle scope systems, start by securing the base and rings to your firearm. We use high-grade aerospace aluminum alloy for our scope bodies, so it is vital to pair them with equally rugged mounting rings—whether you need 30mm, 34mm, or the heavy-duty 35mm options found on our long-range tactical models.
Ensuring Proper Eye Relief and Eye Box
Before tightening the ring screws down, you must position the scope correctly for your specific physique. This step is critical when figuring out how to set up a rifle scope to avoid \”scope bite\” from recoil.
- Position the Rifle: Place the rifle in a steady rest or hold it in your natural shooting position.
- Slide the Scope: Loosen the rings slightly so the tube can move. Slide the scope forward or backward until you see a full, clear field of view without any dark edges (shadowing).
- Check Max Magnification: Always perform this check at the highest magnification setting, as the eye box is tightest there.
For example, when setting up a robust optic like the Visionking 1-10×28 rifle scope with a 35mm tube, ensuring the correct distance between your eye and the ocular lens is essential for maintaining a fast sight picture during tactical engagements.
Leveling the Scope to Prevent Reticle Cant
A common mistake when learning how to set a scope on a rifle is ignoring the vertical alignment of the reticle. If your crosshair is tilted (canted) to the left or right, your elevation adjustments will not track perfectly vertical, causing shots to drift sideways at long distances.
To fix this:
- Use a small bubble level on the rifle rail to ensure the gun is perfectly upright.
- Place another level on the flat top of the scope turret (if applicable).
- Rotate the scope body until both levels match perfectly.
- Tighten the ring screws in a crisscross pattern to apply even pressure without rotating the tube.
Adjusting the Reticle Focus and Eyepiece
Once the scope is mounted and leveled, the final physical setup step is focusing the reticle itself. This is distinct from the side focus or parallax adjustment; this step ensures the etched glass reticle is crisp for your specific eyesight.
Look through the scope at a plain background, such as a clear blue sky or a white wall. Turn the fast-focus eyepiece (the ring nearest your eye) until the reticle lines are sharp and black. Do not look at the target during this step; you only want to focus your eye on the crosshairs. Proper reticle focus is particularly important when using illuminated models, such as the Visionking 1.5-6×42 rifle scope with illuminated Mil-dot reticle, to ensure the illumination points are distinct and not blurry.
Step-by-Step Guide to Sighting In Your Scope
Learning how to set rifle scope settings correctly is the most critical step in ensuring your shots land exactly where you want them. This process, often called \”zeroing,\” aligns your point of aim with your point of impact. Without this, even the most expensive optic is just a heavy accessory. Here is the practical approach to getting on target efficiently.
Initial Bore Sighting for Accuracy
Before you fire a single round, you should bore sight your rifle. This process aligns the center of the barrel with the center of the reticle roughly, saving you a lot of ammunition. If you want to know how to set a scope on a rifle without wasting a whole box of ammo, start here.
The Manual Method (Bolt Action):
- Secure the rifle: Place the gun in a steady rest and remove the bolt.
- Look through the bore: Visually center a target (about 25 yards away) inside the barrel circle.
- Adjust the scope: Without moving the rifle, look through the scope.
- Align the reticle: Use your windage and elevation turrets to move the crosshairs until they center on the same target you see through the barrel.
If you are using a semi-auto or lever action, you might need a laser bore sighter to accomplish this. This gets you \”on paper\” so your first shots are actually visible on the target.
Firing Three-Shot Groups to Establish Point of Impact
Once you are bore sighted, it is time to fire live ammunition. A common mistake when learning how to set up a rifle scope is adjusting the turrets after every single shot. This chases the bullet and leads to frustration. Instead, you need to fire a three-shot group.
- Aim at the center of the target (bullseye).
- Fire three shots carefully, maintaining the same point of aim.
- Observe where the group formed.
Find the center of that three-shot cluster; this is your true Point of Impact (POI). To save yourself from walking downrange constantly to check your groups, using a high-quality Visionking 20-60×60 waterproof spotting scope allows you to see your bullet holes clearly right from the shooting bench. Once you identify the center of the group, measure the distance from that center to the bullseye. This measurement tells you exactly how much you need to adjust your turrets.
Confirming Your Zero at 100 Yards
After you are hitting the bullseye at 25 or 50 yards, move the target out to 100 yards (or your desired zero distance). This is the final stage of how to set up scope on rifle systems for field use.
- Fire another 3-shot group: You will likely hit high or low depending on your ballistics.
- Measure and Adjust: At 100 yards, most scopes with 1/4 MOA clicks require 4 clicks to move the bullet impact 1 inch.
- Final Confirmation: Adjust the turrets based on the group\’s location, then fire one final group to confirm.
If your shots are clustering in the center of the target, you have successfully learned how to set scope on rifle setups for accuracy. Remember to reset your turret caps to \”zero\” once you are finished so you have a baseline for future adjustments.
How to Adjust Elevation and Windage Turrets
Once you have your groups on paper, the real work begins. Learning how to set rifle scope turrets correctly is the difference between guessing and precision. Many beginners get confused here because they overthink the mechanics. When I’m at the range, I treat the turrets as simple steering wheels for the bullet. You are essentially telling the bullet where to go to meet the crosshair.
Adjusting the Top Turret for Vertical Impact
The top turret, known as the elevation turret, controls the vertical movement of your bullet’s point of impact. If your shots are landing too high or too low, this is the knob you need to turn.
When figuring out how to set a rifle scope for elevation, look closely at the markings on the turret. You will usually see an arrow indicating \”UP\” or \”U\” with a rotational direction.
- If your shot is LOW: You need to dial the turret in the UP direction. This moves the point of impact up toward the center of the target.
- If your shot is HIGH: You need to dial the turret in the DOWN direction (opposite of the UP arrow).
Most scopes use either MOA (Minute of Angle) or MRAD (Milliradian) adjustments. A common standard is 1/4 MOA per click, meaning four clicks will move the bullet impact approximately 1 inch at 100 yards. Always count your clicks carefully; don\’t just spin the dial blindly.
Adjusting the Side Turret for Horizontal Impact
The side turret, or windage turret, manages the horizontal axis. This is how to set up a rifle scope to correct shots that drift left or right. Just like the elevation turret, this knob will have markings, usually \”R\” for Right or \”L\” for Left.
- If your shot is LEFT: Dial the turret in the direction marked R (Right).
- If your shot is RIGHT: Dial the turret in the direction marked L (Left).
It is crucial to keep the rifle steady while making these adjustments. If you jostle the rifle significantly while turning the stiff knobs, you might lose your sight picture. When I teach people how to set up scope on rifle platforms, I advise them to use their non-firing hand to make adjustments while keeping their firing hand on the grip to maintain stability.
Determining Which Way to Turn Your Adjustment Knobs
The golden rule for how to set scope on rifle turrets is simple: Chase the Bullet.
Forget about moving the crosshairs for a second and focus on the bullet hole. You want to move the impact point from where it hit to where you aimed.
- Bullet hit Low and Left? Dial Up and Right.
- Bullet hit High and Right? Dial Down and Left.
Many shooters get backwards because they think they are moving the reticle. While the internal mechanics do move the reticle, the turret markings refer to the Point of Impact (POI). If you follow the \”Chase the Bullet\” method, you will never turn the knob the wrong way.
Quick Reference for Turret Adjustments:
| Bullet Impact Location | Elevation Action | Windage Action |
|---|---|---|
| Low | Turn toward UP | N/A |
| High | Turn toward DOWN | N/A |
| Left | N/A | Turn toward RIGHT |
| Right | N/A | Turn toward LEFT |
Mastering how to set a scope on rifle turrets takes a little practice, but once you trust the markings and the math, you can make corrections in seconds. Always double-check your turret caps or locking mechanisms after adjusting to ensure they don\’t shift during transport.
Fine-Tuning Your Scope for Maximum Performance
Once you have established a zero, the real work begins. Learning how to set rifle scope features for advanced scenarios is what separates average shooters from marksmen. I always tell people that a scope is a precision instrument, and squeezing the most out of it requires understanding the finer adjustments.
Setting Parallax for Long-Range Clarity
Parallax error occurs when the reticle and the target are not on the same focal plane. If you move your head slightly and the crosshair appears to \”float\” or shift across the target, your parallax is off. This can cause missed shots even if your hold is perfect.
To fix this, adjust the side focus knob or the adjustable objective (AO) ring until the target image is crisp and the reticle remains rock-steady when you shift your eye position. When shooting at extended distances, relying solely on the rifle optic can be straining; I often use a high-quality Visionking 30-90×90 waterproof spotting scope to observe downrange conditions and target clarity before finalizing my scope\’s parallax settings.
Steps to eliminate parallax:
- Secure the rifle in a rest.
- Look through the scope and nod your head up and down.
- Adjust the parallax knob until the reticle stops moving against the background.
Using Magnification and Zoom Rings Effectively
Many beginners think maximum magnification is always best, but that is a mistake. Learning how to set up a rifle scope means knowing when to dial it back. High magnification reduces your field of view and limits light transmission, making it harder to find targets quickly. It also magnifies your heartbeat and mirage (heat waves).
- Low Magnification: Best for close-range, moving targets, or low-light hunting.
- High Magnification: Best for precision target shooting from a stable bench.
Use the zoom ring to find the \”sweet spot\” where you have enough power to see the target clearly but enough field of view to maintain situational awareness.
Understanding First Focal Plane (FFP) vs. Second Focal Plane (SFP)
When figuring out how to set a scope on a rifle, you must know if your optic is FFP or SFP, as this dictates how you use the reticle for holdovers.
- First Focal Plane (FFP): The reticle grows or shrinks as you zoom. The hash marks represent the same mathematical value (like MOA or Mil) at any magnification. This is ideal for long-range tactical shooting.
- Second Focal Plane (SFP): The reticle stays the same size regardless of magnification. However, the hash marks are only accurate at one specific magnification setting (usually the highest power).
If you are learning how to set up scope on rifle platforms for hunting, SFP is common because the reticle is easy to see at low power. For dynamic long-range shooting, FFP is generally preferred.
Troubleshooting Common Scope Setting Issues
When learning how to set rifle scope parameters, you might encounter issues where shots drift or settings shift. Even with professional-grade optics like ours, external factors can impact performance. Here is how to troubleshoot common problems to ensure your Visionking scope maintains its precision engineering standards.
What to Do If Your Scope Loses Zero
If your point of impact shifts unexpectedly, do not immediately blame the optics. In my experience, the most common culprit is the mounting hardware. Our scopes are built with high shock resistance to withstand heavy recoil, but loose rings or bases can cause wandering zero.
* **Check the Mounts:** Ensure all screws on the rings and base are tightened to the correct torque specifications.
* **Verify the Barrel:** Make sure the barrel is not touching the stock (free-floating) if that is how your rifle is designed.
* **Inspect Groups:** Use a high-clarity optic like the Visionking 30-90×100 Spotting Scope to clearly see your shot groups at 100 yards. If the group is erratic, the issue might be the ammunition or the shooter rather than the scope settings.
Addressing Height Over Bore and Ballistics
Understanding **how to set a scope on a rifle** involves accounting for the mechanical offset between your barrel and the center of the scope, known as height over bore. At very close ranges, your shots will land lower than where the crosshair is aiming.
* **Ballistic Drop:** As distance increases, gravity affects the bullet. You must know the exact distance to your target to adjust your elevation turret or holdover correctly.
* **Tools for Accuracy:** Guessing distance leads to missed shots. I recommend using the Visionking 6×25 Solar Power Range Finder to measure the exact yardage. This data allows you to dial your turrets with the precision required for long-range shooting.
Maintaining Your Scope Settings After Heavy Use
Once you know **how to set up a rifle scope**, maintaining those settings requires regular care. Our scopes feature nitrogen-filled bodies for 100% waterproof and fogproof performance, but neglect can still cause issues.
* **Lens Care:** Keep the fully multi-coated lenses clean using a proper brush or cloth. Dirt can obscure the etched glass reticle.
* **Turret Checks:** After a day of tactical use or hunting, verify that your windage and elevation turrets are reset to zero or capped securely.
* **Storage:** Store the rifle in a way that does not put pressure on the objective bell or eyepiece, ensuring the alignment remains true for your next session.